


PDF forms are a useful way to gather information. Generally, PDF forms are designed in a GUI editor and form functionality is added using Adobe Acrobat, Foxit, or another PDF form creation tool. This is a bit of work, but if the forms don’t change very often, it’s not too bad. If the forms do change often, you might be considering how to automate form creation. Since the rest of your content is in DITA, DITA is a reasonable choice for sourcing the forms.
Before starting, there are a few questions you should ask yourself to see if you’re likely to be successful with DITA-based forms creation.
How will you use the form?
It is possible to create DITA content that can be transformed to PDF forms, but there are many considerations. The first consideration is how the form will be used. For example:
- Will the form include a Submit button (or something similar) that submits the form to a server?
- Will a user complete the form, save the PDF, and attach it to an e-mail for manual processing?
If the latter, you have more flexibility in how you choose to transform DITA content to a PDF form. You can take a much more generic approach. If the former, you will have to create that treat each form uniquely with unique form names, field names, and submission methods.
In this case, if you have more than a handful of forms, it is probably not practical, time-effective, or cost-effective to create them from DITA content. You are likely better off creating them using PDF tools—even if that is not as automated a process as you’d like.
In this article, I’ll look at creating generic forms from DITA content and offer step-by-step instructions that you can expand on and apply to your own form creation process.
What PDF renderers can you use?
- Apache FOP: It is currently not possible to create PDF forms using Apache FOP.
- XEP: It appears that XEP does not include any native extensions for creating PDF forms, although it is possible to integrate XEP with VisualXSL. (http://www.renderx.com/files/VisualXSLUserDocumentation.pdf).
- Antenna House: Currently, Antenna House seems to have the best native support for PDF forms, so the examples in this article use Antenna House extensions.
The Antenna House extensions are well-documented at Acroform in PDF output on the Antenna House website (https://www.antennahouse.com/product/ahf65/ahf-ext.html#acroform_. (If necessary, edit the URL to reflect the version of Antenna House you are using. For example, change “ahf65” to “ahf63” if you are using Antenna House 6.3.)
There are examples of various form fields on the Antenna House website
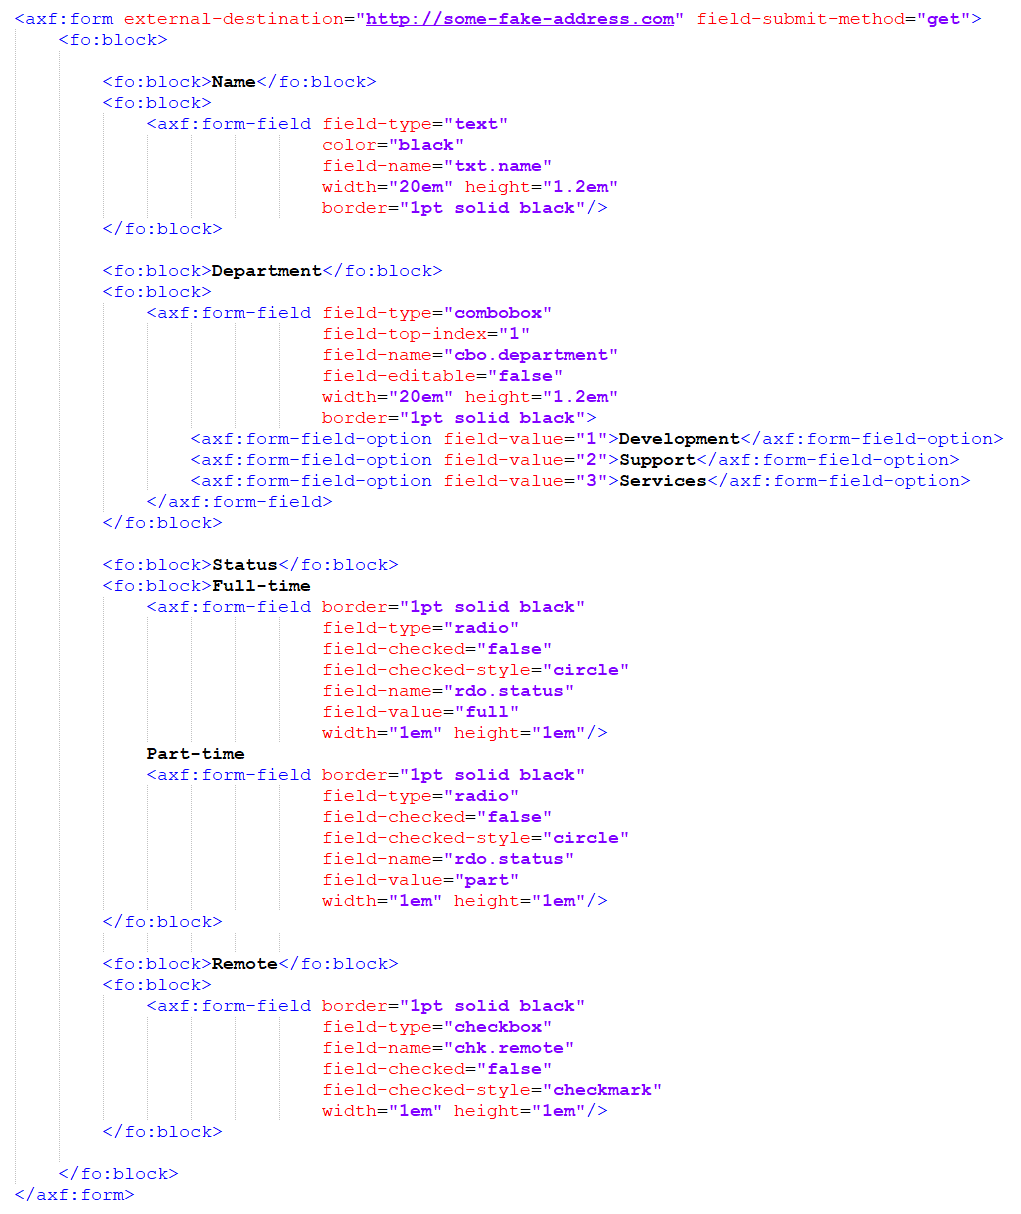
Example of a PDF Form in XSL-FO
When you generate a PDF from DITA content, the DITA Open Toolkit first transforms your DITA XML to another kind of XML called XSL-FO, which is the markup that Antenna House understands. Therefore, it’s helpful to see what kind of XSL-FO Antenna House is expecting, so you know what elements you need to transform your DITA content to.
Here is an example of a simple form with minimal styling:
Here is the same form rendered in a PDF, both empty and completed:
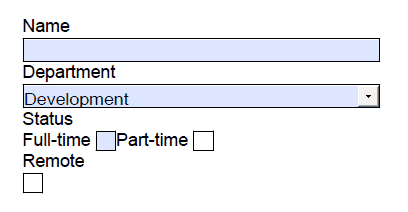
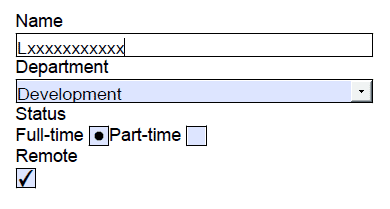
Note: The PDF renderer and PDF viewer have a lot of influence over how form fields appear. There is some CSS styling available for form fields, but it’s not extensive.
As you can see, Antenna House uses elements such as <axf:form> and <axf:form-field> to generate forms. These elements are not standard XSL-FO elements like <fo:block> or <fo:inline>, for example. Only Antenna House can process them.
Just as templates are used in the PDF plugin to transform DITA elements such as <p> to <fo:block> or <uicontrol> to <fo:inline>, you have to use those same templates to transform DITA elements to <axf:form-field> with the appropriate attributes and values. This is the tricky part. How can you set up your DITA content to transform seamlessly to these form elements?
I’m going to look at one way of creating a DITA concept so that it can be transformed into XSL-FO similar to the previous example. Bear in mind that there is no one way to create DITA content meant for form generation. The approach you use depends on how you want the form to appear.
Creating the Form in DITA
I start with a concept topic. The concept might include a bit of information just after the title that isn’t necessarily part of the form. Therefore, it seems logical to include the form in a <section> element to give me a single unit of information to work with:

Notice the section is marked @outputclass=”form”. I’m going to use this @outputclass value to specify that this section should be transformed into an <axf:form> element.
Text Field
Next, I need to decide which elements to use for the form fields. <p> seems like a straightforward choice for a text field:

Obviously, I don’t want to process this <p> as an actual paragraph. Again, notice the @outputclass=”form.text” that indicates this <p> is transformed in a special way. Notice the @otherprops as well. When I transform this DITA to a PDF form, I’m going to use the @outputclass value to indicate that this <p> should be transformed into a <axf:form-field> element.
I’m going to use the @otherprops value to specify the field’s name in the PDF form.
A text field is the simplest of fields, so all I need to include here is the label “Name:” which I wrap in a <uicontrol>—again to give me a little more flexibility in transforming it separately, and also in applying additional styling (if I want to).
Combo Box
Next, I look at the Department combo box. This field will be more complex because I also need to build the list of options in the box. I choose to structure this type of field as a <p> with a nested <ul> to capture the options:
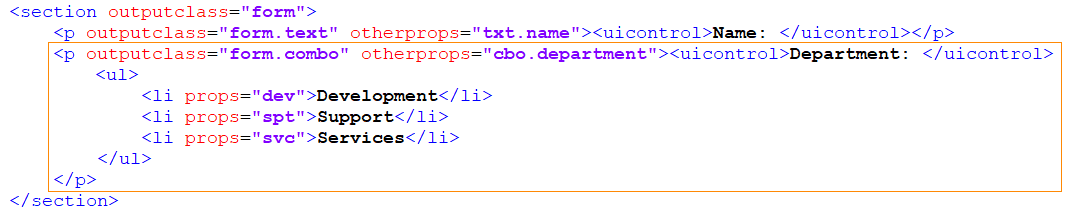
Again, notice the @outputclass=”form.combo” and the @otherprops. These function the same as with the text field. Notice also the @props on each <li>. When you select an item in a list box or a combo box, you pass in a corresponding value to whatever function is processing the form. I’m going to use @props to specify the value to be passed in for each option in the combo box.
Radio Buttons
Next, I come to the Status radio buttons. This is also a little more complex because I need to build the two options.
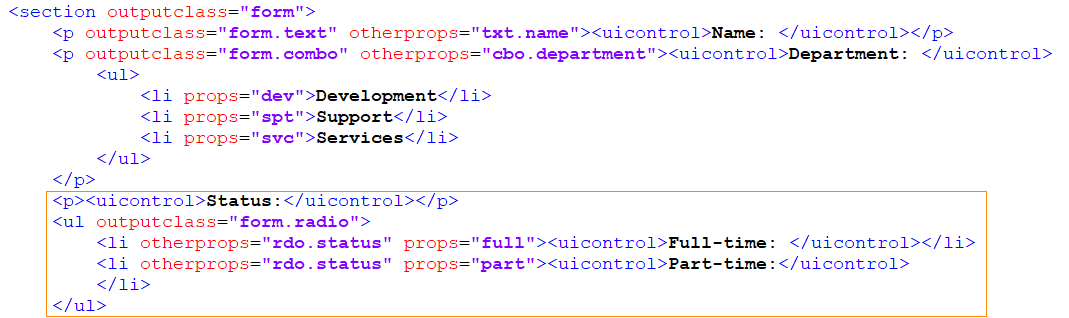
The radio button markup is different from the combo box markup. Notice that the <ul> is not nested in the <p> that contains the label for the radio group. This is because the radio group label is not directly associated with the radio buttons; each radio button has its own label. There is nothing special about the radio button group label, so it has no associated @outputclass or @otherprops.
The radio button group itself is a <ul> with each radio button an <li>. A nested <uicontrol> creates the label for each radio button. Notice the <ul>’s @outputclass=”form.radio” and each <li>’s @otherprops=”rdo.status” and @props=”full”. These function the same as for the combo box. With a radio button group, the entire group constitutes one field; therefore, both <li>’s are going to have the same field name (rdo.status). Each radio button indicates a different value input for the field, so each <li> has a distinct @props value.
Check Box
Finally, I create the check box:
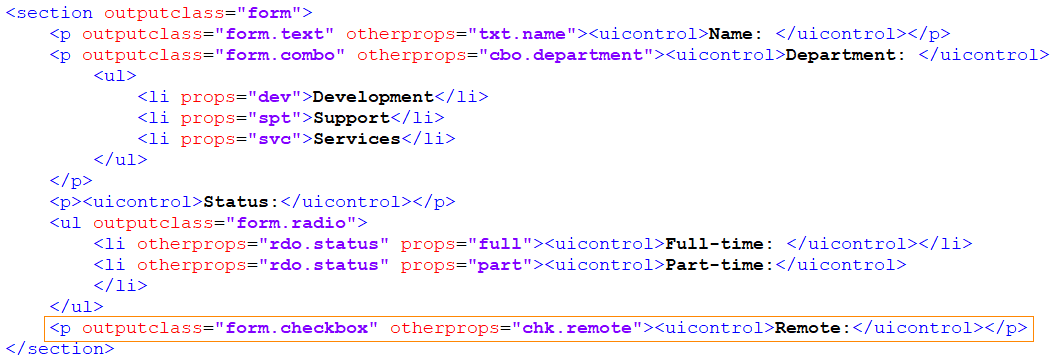
This is also straightforward, much like the text field. I don’t have to specify any options or any values. A check box is inherently true/false. The @outputclass and @otherprops function the same as for the text box.
I now have all the DITA structure I need to create a PDF form. This is where things get really interesting. I need to transform this DITA topic into something similar to the previous XSL-FO example. I’ve limited my DITA markup to <section>, <p>, <ul> and <li>, so I know that I need to edit the templates that transform those four elements.
Note: The steps below apply to DITA OT 2.x. This approach works equally well with DITA OT 1.8.5 but the <section> and <p> templates mentioned are found in commons.xsl in that version and might be slightly different.
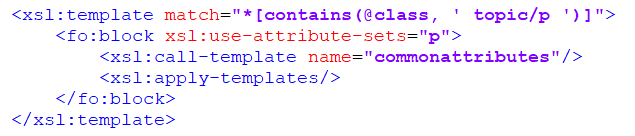
Editing the <section> Template
The basic <section> template is found in topic.xsl:

I copy this template into my PDF plugin and edit it as shown:
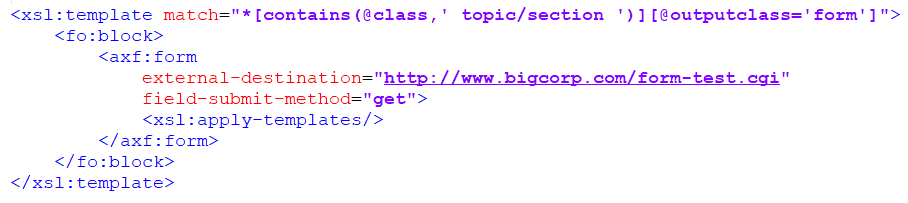
IMPORTANT: You must include the following in the xsl declaration of any stylesheet in which you want to use the axf: extensions: xmlns:axf=http://www.antennahouse.com/names/XSL/Extensions.
This template matches on <section> elements that have @outputclass=”form”. Instead of transforming the <section> to an <fo:block> element, it transforms the <section> to an <fo:block> with a nested <axf:form> element.
If you do not plan to submit the form, you do not need @external-destination or @field-submit-method. If you do plan to submit the form, you might need a separate template for each form to specify this information uniquely (or many xsl:when conditions in this template, or a way to concatenate some other value you supply in the DITA content). As I mentioned earlier, this approach is not very scalable.
Editing the <p> Template
In my DITA topic, I have three <p> elements that need to be transformed to different types of form fields, indicated by the @outputclass on the <p>’s.
The <p> template is also found in topic.xsl:
Text Field
I copy this template into my PDF plugin three times and edit the first copy as follows:
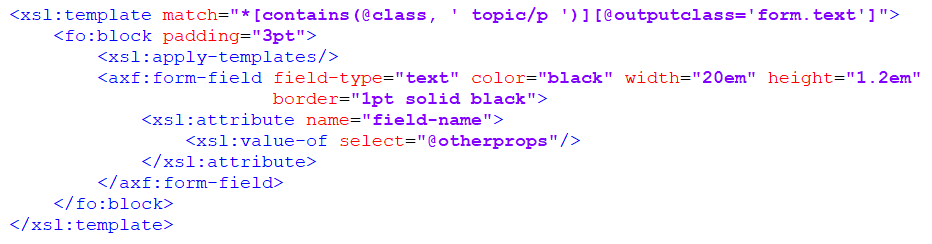
This template first outputs the field label (the <uicontrol> element) via an <apply-templates> and transforms a <p> element with @outputclass=”form.text” to an <axf:form-field> element of the “text” type with the attributes shown. As the name of that field, the template selects the <p> element’s @otherprops value.
This template takes care of my text fields. I don’t need to do anything else (except fine-tune the styling if necessary).
Combo Box
I edit the second copy of the <p> template as shown:
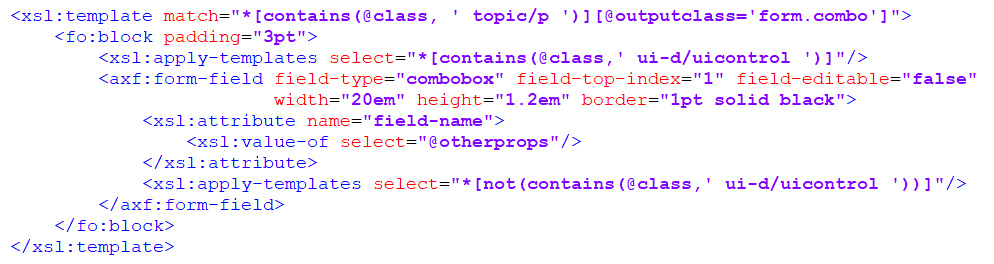
This template transforms a <p> element with @outputclass=”form.combo” to an <axf:form-field> element of the “combo” type with the attributes shown. As the name of that field, the template selects the <p> element’s @otherprops value. This template first outputs the field label (the <uicontrol> element) via an <apply-templates> that specifically selects the <uicontrol>. The second <apply-templates> outputs everything else—that is, the <ul> that makes up the combo box and its selections.
Of course, I’m not done with my combo box fields. I need a separate template to transform the <ul>. I put that aside for now.
Check Box
I edit the third copy of the <p> template as shown:
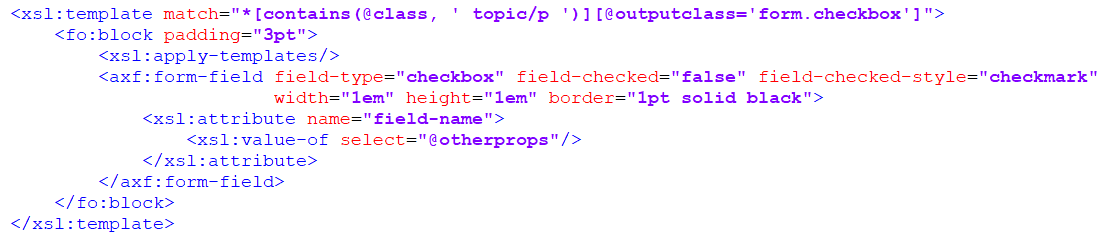
This template first outputs the field label (the <uicontrol> element) via an <apply-templates> and then transforms a <p> element with @outputclass=”form.checkbox” to an <axf:form-field> element of the “checkbox” type with the attributes shown. As the name of that field, the template selects the <p> element’s @otherprops value.
This template takes care of my checkbox fields. I don’t need to do anything else (except fine-tune the styling if necessary).
I have not addressed radio button fields here because I set those up as <ul> elements and so I need a completely different set of templates to process them, along with the combo box fields.
Editing the <ul> Template
I now need to transform the <ul> elements in my DITA topic to create a combo box field and radio buttons. First, I copy the <ul> template into my PDF plugin. This template is found in lists.xsl:

I need to transform <ul> element in one of three ways:
- as a combo box if the <ul> is a child of a <p> with @outputclass=”form.combo”
- as a radio button if the <ul> is a child of a <p> with @outputclass=”form.radio”
- as a regular <ul> otherwise
Therefore, I need to add an <xsl:choose> to my copy of the <ul> template to test for these conditions. I edit the template as follows:
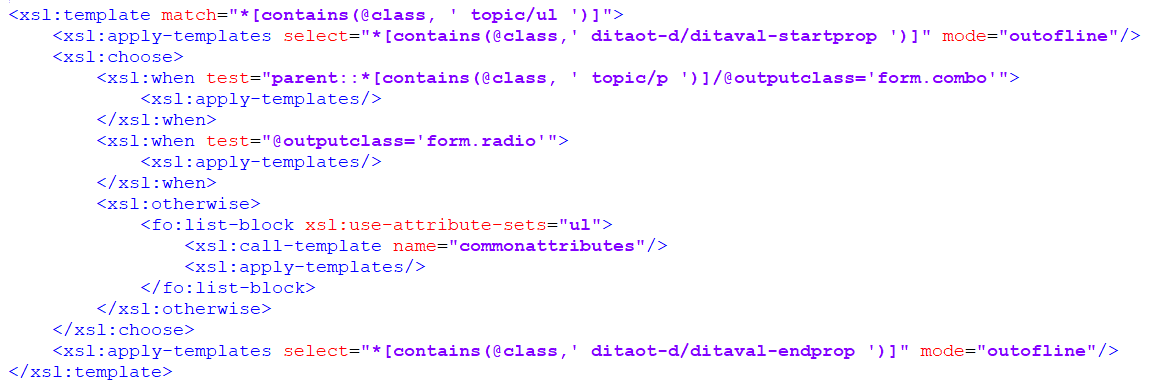
In the first two <xsl:when> cases, I use <apply-templates> to more or less “pass through”—I’m not really doing anything with the <ul> itself. The work is actually going to be done on the <li> elements.
Now I move on to those elements.
Editing the <li> Template
First, I need to transform the <li> elements so I copy the <li> template into my PDF plugin. This template is also found in lists.xsl:
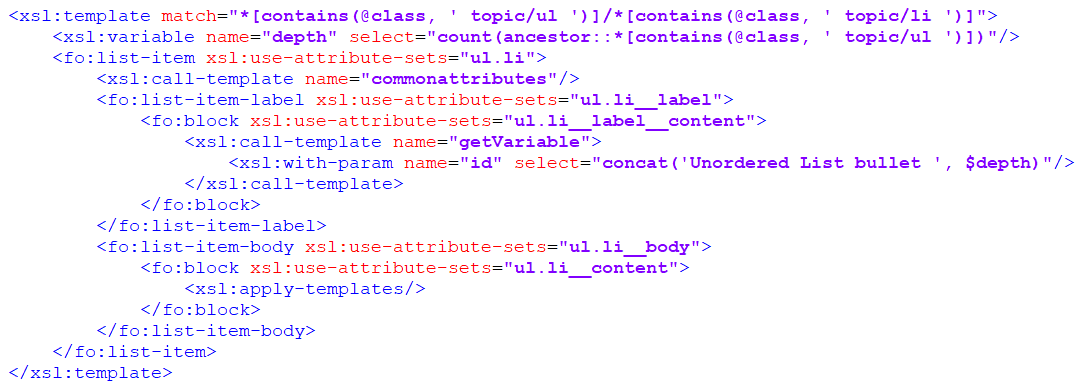
(Notice this template matches on <li> elements in <ul>. There is a separate template that matches on <li> element in <ol>, which I don’t need.)
I need to transform <li> elements in one of three ways:
- as a combo field option if the
<li>is a descendant of a<p>with @outputclass=”form.combo” - as a radio button if the
<li>is a descendant of a<ul>with @outputclass=”form.radio” - as a regular
<li>otherwise
I edit the <li> template as shown:
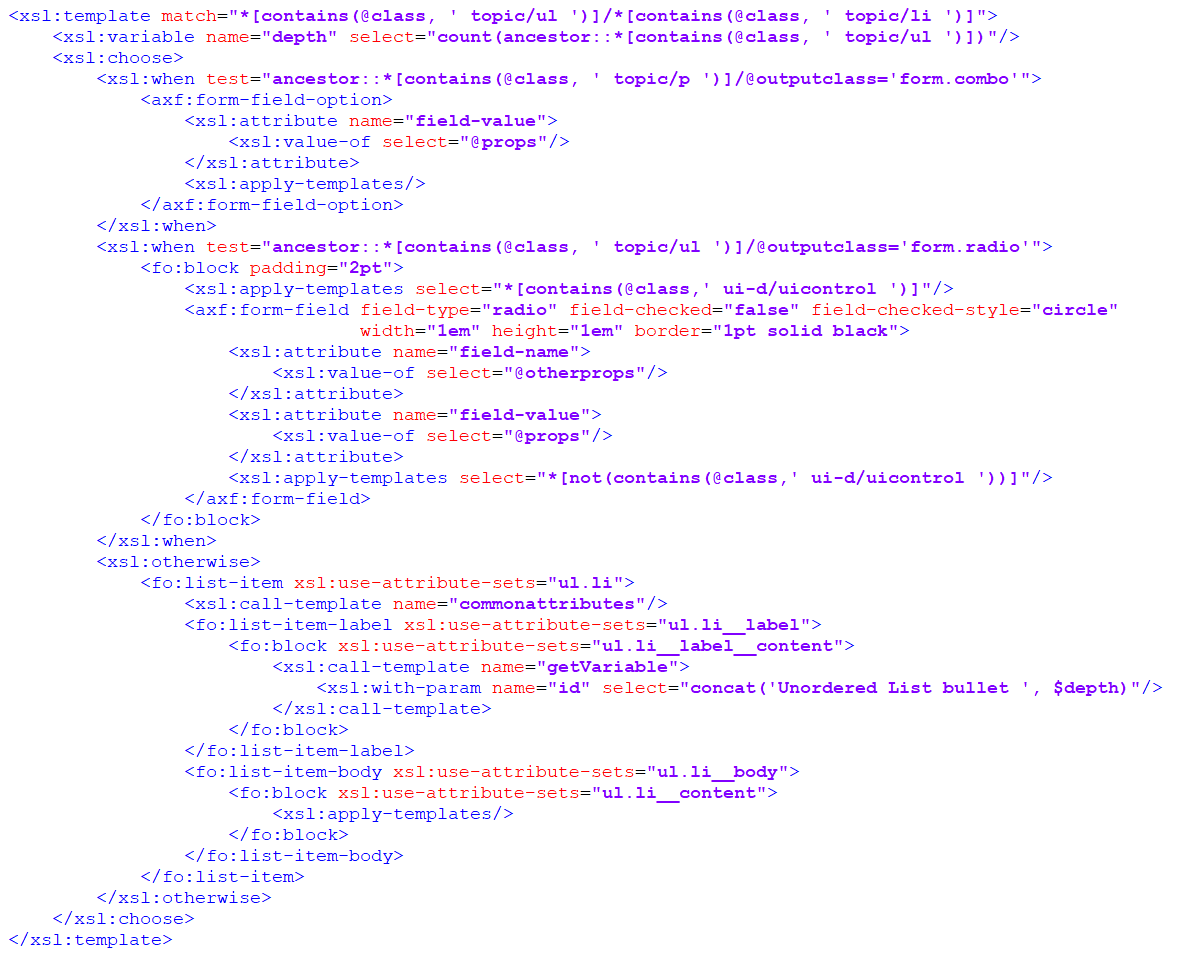
In the first <xsl:when> case, I transform each <li> into an <axf:form-field-option> element with the attributes shown. The <li>’s @props value becomes the value passed in by the option.
In the second <xsl:when> case, I transform each <li> into an <axf:form-field> element of the “radio” type with the attributes shown. The <li> element’s @otherprops value becomes the field name and its @props value becomes the value passed in by the field.
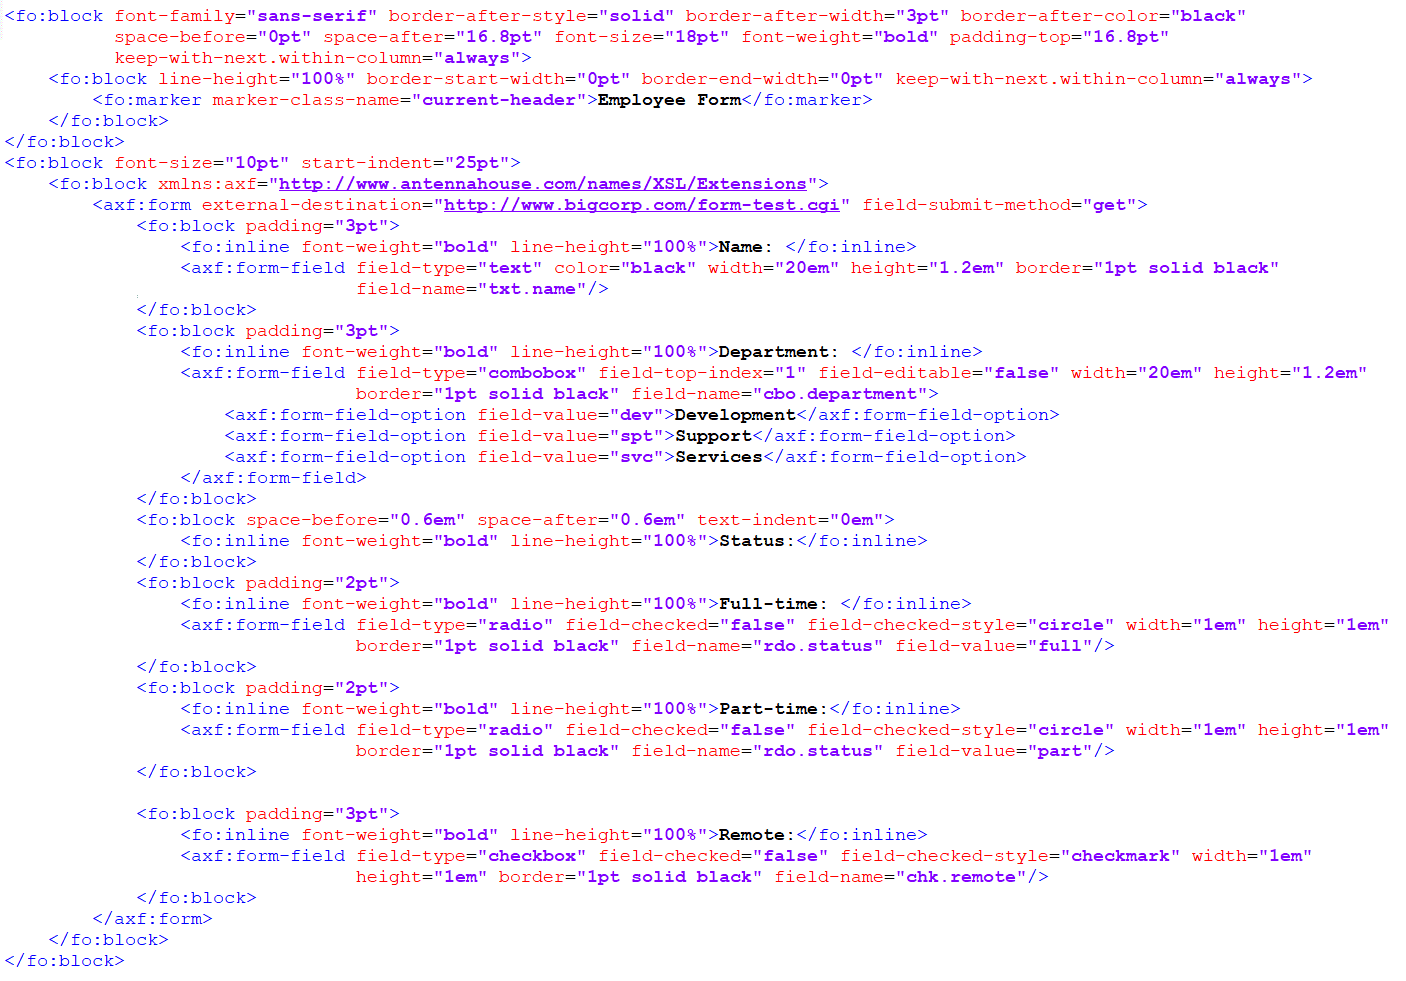
The Final Product
Here is the XSL-FO for the form I just created:
A Note About @otherprops and @props
For this simple example, I use @otherprops and @props. These are both generic attributes. @otherprops is really intended for ditaval filtering and @props is really intended as a basis for specialization. Ideally, you should specialize your own attributes to be used specifically for capturing field names and values. Doing so makes your XSL more intuitive and ensures no accidental “bumping into” other usages of @otherprops or @props that might exist elsewhere in your plugin.
Conclusion
As I mentioned, this example is only one approach for creating DITA content that can be transformed to PDF forms. You might choose additional or other elements to capture the form fields. There are other use cases I did not cover in this blog post. Hopefully, however, you now have enough information to evaluate whether you have a good use case for automatically creating PDF forms from DITA content, and how you need to create that DITA content to ensure you’re able to transform it to PDF forms.