Publishing tags are properties
that are applied to a map and its topics when a map is published.
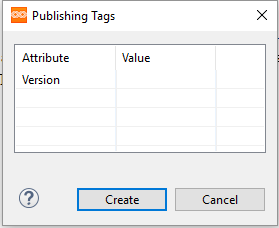
Publishing tags appear when a user selects the Publish
option for a map, as shown below. For example, a user can select the Version publishing tag and enter a new version number for the map being published.
Once published, the new version value appears in the published DITA map's Version column.Figure: Configured publishing tags Publishing tag values are also written into each document's Custom
Properties file; for
example:
<version>4.0</version>
To define a new
publishing tag:
Open the TEXTML Administration perspective by clicking the
TEXTML Administration shortcut on the
tool bar. If the shortcut is not displayed, follow these steps:
Select Window > Perspective > Open Perspective > Other
Click TEXTML
Administration.
Click Open.
In the TEXTML
Administration view, double-click the server. If your server is
not displayed in the view, you must add it to the view.
When the Connect as dialog
opens, type your username and password and click OK.
Double-click the name of your Content Store to open a connection to it.
Locate the publishtags.xml file in the repository's
/system/conf collection.
Determines whether the user-entered value is written to all
children elements (true) or just to the map itself (false).
true or false (default)
label
Determines the tag label displayed in the Publishing
Tags dialog box.
Any sequence of characters.
mandatory
Determines whether the user must enter a tag value.
true – user must enter a value to
publish.
false (default) –
publishes without user input.
metaname
Defines the element where the user input will be written in the
Custom Properties file.
Must be the same as the NAME attribute of the
corresponding index definition.
historical Uniqueness Index
If present, TEXTML Server verifies that the publishing tag value
is unique within the index. For example, for the version tag, this
means that you won't be able to reuse a publication version when
publishing.
Must be the same as the name of the corresponding index
definition. For example, to indicate that the version value entered by
the user must be unique within the index,
enter:
historicalUniquenessIndex="version"
Create one or more <classbehavior> elements to determine
how the publishing tag values will be written into the Custom Properties file of each
type of object, as follows:
Note: In this file, an image is treated as a topic by the
CMS. Publication information is written into its Custom Properties
file.
name
Determines the action taken with respect to existing information
in an object's Custom Properties file.
Only override is supported. The implementation depends on
the value attribute, described below.
value
Determines whether the override action is actually carried out.
true – existing publishing tags with the
same metaname are overwritten.
false – the system adds another
publishing tag with the same metaname to the object's Custom
Properties file.
Save, close, and check in the publishtags.xml file.
The next time that a user publishes a document using the new tag, the tag
value will be written to each document's Custom Properties file.
Inform users of the changes.
The changes will be applied automatically
once users close and then reopen their IXIASOFT CCMS Desktop. Users can also apply the changes without
restarting their IXIASOFT CCMS Desktop by clicking
IXIASOFT CCMS > Synchronize Configuration.